MooreSpeechCorpora Toolkit, Collecting Mooré Data from the Bible
From data collection to Hugging Face ready dataset.
Working with under-resourced languages like Mooré is both exciting and challenging. In this tutorial, I’ll walk you through the full pipeline I used to collect and prepare Mooré speech data scraped from the Bible-ready to be pushed to the Hugging Face Hub.
1. Environment Setup
Let’s kick things off by setting up the Python environment.
Create a new virtual env with preferably Python 3.10.11:
1
2
conda create -n mooredata python=3.10.11
conda activate mooredata
Also, I recommend downgrading pip to 24.0 (or below):
1
pip install --upgrade "pip<24.1"
You may be asking yourself why these specific constraints from the beginning. Well, I’ve got many errors while trying to work on this using Python 3.12.0 and 3.11.13. The raised error was:
1
2
ValueError: mutable default <class 'fairseq.dataclass.configs.CommonConfig'>
for field common is not allowed: use default_factory
After quite a lot of investigations, I found out that the ValueError occurs when using Fairseq v0.12.2 with Python 3.11 or 3.12 due to its use of mutable dataclass defaults, which are disallowed in these Python versions. That’s why, to fix this, I downgraded to Python 3.10 and pip <24.1.
Trust me, just make sure to do the same to not waste a lot of time resolving package conflicts like me.
2. Install Audio & Text Processing Dependencies
Next, let’s ensure you have all required system-level packages.
Update the package list:
1
sudo apt-get update -y
Normally you should already have the necessary environment-level packages:
- for audio processing:
libsox-fmt-all,sox, andffmpeg - for text processing and Unicode symbols:
libicu-devandpkg-config
If not, install them:
1
2
sudo apt-get install libsox-fmt-all sox ffmpeg
sudo apt install libicu-dev pkg-config
3. Install Torch (Nightly Version)
Now it’s time to install PyTorch. Make sure to get the nightly version from the official PyTorch website.
If you have a Nvidia GPU, select the CUDA version. Otherwise, stick with CPU.
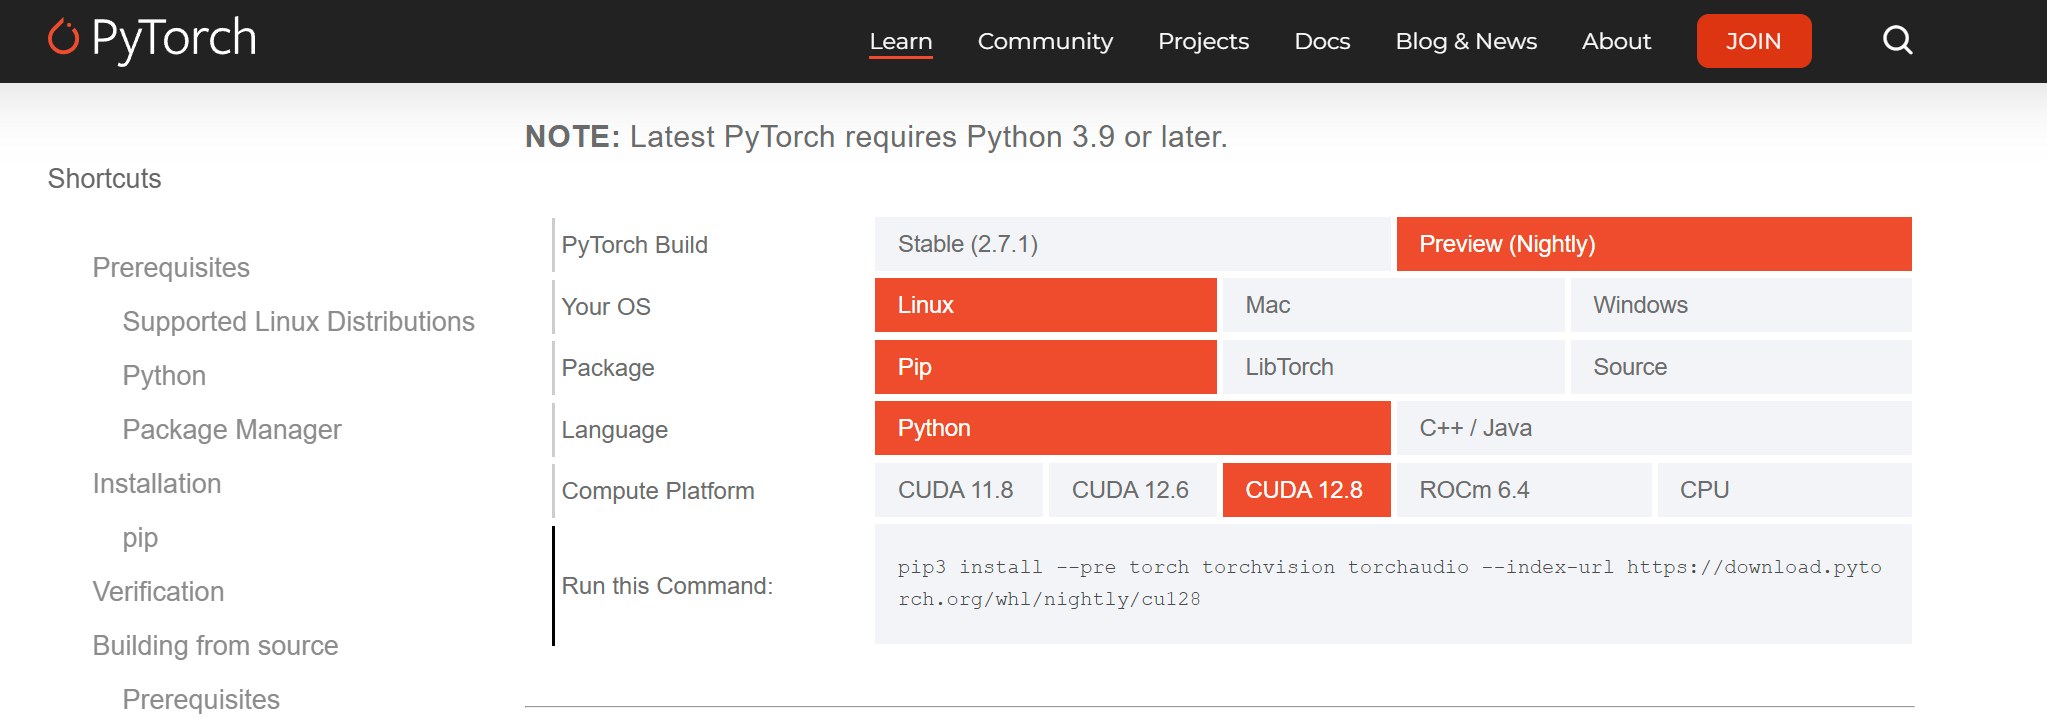
For me, the command was:
1
pip3 install --pre torch torchvision torchaudio --index-url https://download.pytorch.org/whl/nightly/cu128
Then install additional packages:
1
pip3 install -r requirements.txt
4. Clone Required Repos
We’ll need two external repositories to proceed.
Fairseq
1
2
3
4
git clone https://github.com/facebookresearch/fairseq.git
cd fairseq
pip install --editable ./
cd ..
Uroman
1
git clone https://github.com/isi-nlp/uroman.git
Make these changes to match what Fairseq expects:
1
mkdir -p uroman/bin && mv uroman/uroman/uroman.pl uroman/bin/uroman.pl && mv uroman/uroman/data uroman/data
Your folder structure should now look like:
1
2
3
4
5
6
7
moore-data-scraping-bible/
├── fairseq/
└── uroman/
    ├── bin/
    │   └── uroman.pl
    ├── data/
    └── (other folders)
5. Scraping Bible Data
With everything in place, let’s scrape the Mooré Bible data.
Execute:
1
sh ./crawlers/bible/crawl.sh
If you run into this error:
1
ImportError: /home/anyantudre/miniconda3/envs/mooredata/bin/../lib/libstdc++.so.6: version `GLIBCXX_3.4.30' not found (required by /lib/x86_64-linux-gnu/libicuuc.so.74)
Fix it with:
1
conda install -c conda-forge gcc=12.1.0

6. Resampling
Now let’s resample the scraped audio files to 16kHz.
Run:
1
bash preprocessing/resample.sh --input_folder datasets/moore/bible/raw --output_folder datasets/moore/bible/resampled
If the script fails due to formatting, convert it to Unix-style line endings:
1
2
sudo apt install dos2unix
dos2unix resample.sh
7. Forced Alignment
This is a crucial step: segmenting long audio clips into short, clean utterances.
We’ll use the MMS Forced Aligner. You can check if your language is supported here. For Mooré, the model code is mos.
Run the alignment script:
1
2
3
4
5
6
bash forced_alignement/align_and_segment.sh \
  --audio_folder datasets/moore/bible/resampled \
  --text_folder datasets/moore/bible/resampled \
  --output_folder datasets/moore/bible/aligned \
  --lang mos \
  --uroman_path ../uroman/bin
On an Nvidia RTX 4070 (8GB), this took ~5 hours.
8. Export to Hugging Face Format
Last step!
Log in to your Hugging Face account:
1
huggingface-cli login
Then push your dataset:
1
2
3
4
python data_export/prepare_hf_dataset.py \
  --input_folder datasets/moore/bible/aligned \
  --repo_id anyantudre/moore-speech-bible \
  --hf_token hf_xxxx
⚠️ Note: By default, datasets pushed to the Hub are public. You can update this later from your Hugging Face dashboard.
That’s it! 🎉 You now have a fully processed, aligned, and ready-to-train Mooré speech dataset, directly from Bible text and audio. Hope this helps you save some setup time and avoid the many little snags I ran into.
Feel free to fork the repo, tweak things for your own language, and contribute improvements.